Risotto Bianco with Rocket & Parma Ham

Risotto Bianco with Rocket and Parma Ham

2 tblspn olive oil

2 tblspn butter

1 large onion, finely chopped

5 sticks of celery, finely chopped

4 cloves of garlic, finely chopped

250ml dry white wine

350g arborio rice

1 litre chicken or vegetable stock (homemade)

Salt

2 handfuls grated Parmesan

50g butter

Pepper

To serve:

Parma ham

Rocket

  • In a large pan, heat the oil and butter over a medium heat until melted.  Add the onion, celery and garlic and stir to coat.  Reduce heat a little and cook gently for 15 – 20 mins until vegetables are soft and translucent but not caramelised.
  • Meanwhile, heat the stock in another pot until simmering.  Reduce heat to keep stock hot but not simmering.
  • Increase the heat to medium high and add the rice.  Stir to coat with oil and combine with the veg and cook for a minute.  Add the wine and let it bubbly up, stirring occasionally.
  • Now for the relaxing part…  Reduce the heat to medium and add a ladle of stock to the rice and stir with a wooden spoon firmly, massaging the rice until all of the liquid is absorbed.  You want the rice and liquid to just simmer at a gentle blib not vigorously.  Keep adding the stock and letting it absorb until the rice is almost soft and the last ladle has been absorbed.  Taste for seasoning at this point, adding salt and pepper to taste.  Don’t be too liberal with the salt as the Parmesan and Parma ham will also add salt.
  • Remove the pot from the heat.  Stir in the remaining butter then cover and let sit for a couple of minutes.
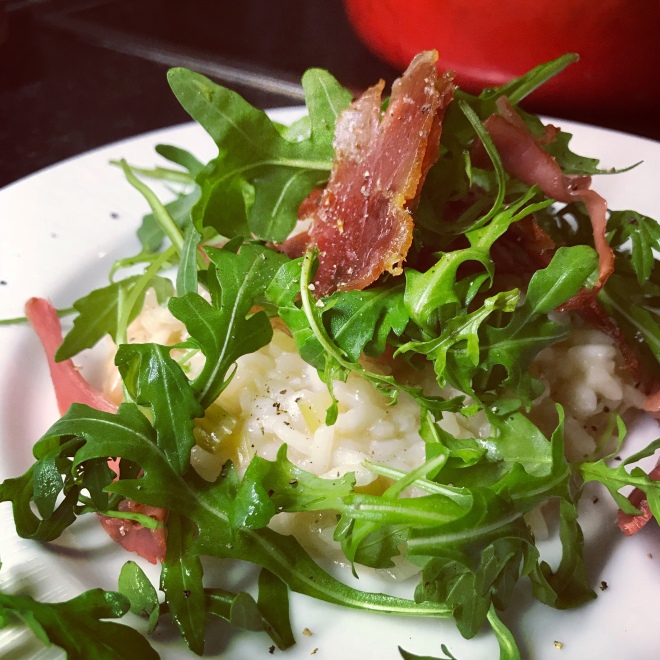
  • Stir well again then serve topped with parma ham and rocket.

San Sebastian – Pinxtos and Squid Trainera

19748440_10155453970856953_3316229060154426546_n

Our main reason for going to go to San Sebastian this summer was the food.  We wanted to bar hop and drink the traditional basque white wine, txakoli, all the while sampling lots of different pintxos.  Pintxos are small portions of food – what we outside of Spain usually call tapas.  Turns out tapas in Spain come “free” with food  whereas pintxos are paid for, portion by portion.  Pintxos are often (but certainly not always) more refined or elaborate than tapas too.

So during our 10 days in San Sebastian we walked and cycled and explored the city, and in the evenings we headed out to sample the town’s pintxos.  Turns out finding the best food and navigating the bars was a skill to be learnt.  The bars are busy and noisy and were a little intimidating at first.  In our first pinxtos bar on our first day, I managed to steal food from another customer’s plate and had to be told to give it back.   Mortifying, yes, but at least I could then drop any pretence of knowing what I was doing!

19748867_10155434471161953_7987723127431937986_n

If you’re heading to San Sebastian, these are our tips on making the most of the pintxos…

  • Order the hot pinxtos (pintxos calientes).  These are fresher and often more interesting.  Outside of the old town this menu will only be in Spanish and/or Basque.  We relied on my Spanish – I know maybe 50 words and most are food related – and some English speaking bar staff but we met a Norwegian couple who were using the Microsoft Translator App and it worked a treat – they just took a picture of the menu and the app translated the words it could.  The Apple version was a bit of a faff, however, so we gave up on it.
  • Head out of the old town sometimes.  There are lots of good pinxtos bars in the old town but there’s plenty to discover outside of this area too.  Three streets we liked to visit were San Martzial Kalea just behind La Concha beach; the area around De Cataluña Plaza  in Gros; and the streets De Felipe IV Hiribidea and Isabel II.a Etorb . up near the Anoeta stadium.
  • Learn a little Spanish as well as the Basque words for Hello and Thank you.  You’ll have no problems using English in the old town but heading away from the touristy area there are far less English speakers.
  • Most bars run a tab where you pay for your food and drink when you are ready to move on.  Make sure you show the bar staff what you are taking and keep a mental note too.
  • Raciones are larger portions of food.  Do not order four of these at once.  It’s a lot of food.  Trust me, I know.
  • Many bars tended to stop serving food around 11pm.  Cold pinxtos were available until midnight/1am.
  • We booked a pinxtos tour for our second night through San Sebastian Pintxos Tours.  It was quite pricey but absolutely worth it in the end.  Our guide was charming and informative and the experience gave us the confidence to make even more of the food scene in San Sebastian.

19884296_10155453970476953_4609298748416584260_n

One of our favourite bars was Mesón Martín.  The gambas rebozadas (battered prawns) were outstanding as was the squid trainera.  A trainera is a traditional Basque boat but the term is also used to describe a slice of baguette topped with seafood.  The following was a trainera I returned to order again and again then I came home and made it so I could continue eating it some more.  It’s very easy to put together and really great BBQ food.


19894732_10155453970481953_434651509450120206_n.jpg

Squid Trainera

Garlic infused olive oil  (Shop bought or simply slice up a whole head of garlic and add to 250 extra virgin olive oil – heat very gently until the garlic starts to cook and the oil becomes fragrant – let cool and store in the fridge for up to a month)

2 cm wide slices of baguette

Slice of jamon or other thinly sliced cured meat

1 large prawn per trainera

1 small squid per trainera 

Parsley and salt to serve

  • Pat dry the squid and prawns and rub with oil.  Cook over BBQ coals or under a hot grill for 4 – 6 minutes until the prawns are pink and the squid is lightly coloured/blistered.
  • Toast the bread and brush with garlic oil.  Add a slice of jamon, a squid and a prawn.  Drizzle with more garlic oil and spinkle with salt flakes and parsley.


Nashville Hot Chicken

We fell in love with Nashville last summer.  Oddly, it was David’s choice of destination on the trip.  I’m the country music fan but he was the one that suggested it and continued pushing for a visit, even though it was out of our way.  So visit we did and we loved it.

Nashville’s a good looking, laidback town with great food, super friendly folk and an unbelievable music scene.   The latter may seem like a rather obvious statement but we couldn’t get over just how much good music was available all over the city, all the time.  We’d go back in a shot.

Nashville Hot Chicken is a must-eat when you visit.  Moist fried chicken with a blow-your-head-off coating placed on a slice of white bread and served with pickles.  I knew I had to learn to make it when I returned and that’s exactly what I’ve done.  My waistline may never recover.  😉

IMG_4119

Nashville Hot Chicken 

Serves 4

8 chicken legs and thighs 

200ml tabasco sauce

2 tblspn brown sugar

Plain flour

1 litre vegetable oil

1 tblspn chilli flakes

2 tblspn cayenne pepper

1 tspn smoked paprika

1 tspn garlic powder

1/2 tspn cumin powder

1-2 slices of white bread per person

Dill pickles

  • The day before you eat, make the brine.  Add the sugar, tabasco and two heaped tablespoons of salt to 1.5 litres of water.  Heat gently on the stove until the sugar and salt have dissolved.  Let cool.  Once completely cool, add the chicken, ensuring it’s completely submerged.  Pop in the fridge over night.
  • For the hot oil coating:  Add 100 ml of oil to a small frying pan.  Stir in the chilli flakes, cayenne, garlic powder, paprika and cumin along with a teaspoon of salt and a good grinding of pepper.   Heat gently until the oil warms up and the spices combine – do not over heat, you just want the oil to become aromatic.  Set aside.
  • Remove chicken from the brine and pat dry with kitchen roll.    Warm an oven to 50oC.  Tip plain flour into a shallow bowl and season well with salt and pepper.  Heat the rest of the vegetable oil in a large pan (it should be about 3″ deep) until 175oC.  Cook three pieces of chicken at a time by dredging them in the seasoned flour, shaking then placing in the oil.  The chicken should cook for 10 mins then be turned.  Highly recommend that you read and follow these instructions for perfect fried chicken.  Place cooked chicken on a rack in the warm oven while you cook the rest.
  • Once all the chicken is cooked, gently heat the oil again then brush generously all over the chicken pieces.
  • Serve chicken on slices of plain white bread with plently of dill pickles.  I like to have a small jug of the spiced oil available for those of us who like our hot chicken extra hot.  🙂


Cornbread and Beans…

We ate a lot of cornbread this summer and not all of it good.  Often I found it too cakey and extremely sweet . When it was good, however, it was fantastic.  Stand out cornbread experiences included my friend, Nanette’s kitchen, the dining hall of the Folk School and an excellent brunch in Marché Artisan Foods, Nashville.

Since returning I’ve made this version by Anna Jones several times.  It’s a coriander and chilli spiked version made with cornmeal and fresh corn.  Not very traditional, perhaps, but a cracker of a recipe.

PS If you don’t know Anna Jones, I highly recommend her cookbooks.  All dishes are vegetarian and I’m yet to find one that underwhelms me.

Red Currant and Almond Muffins

IMG_1050IMG_1051IMG_1147

IMG_1060

I forgot we had red currant bushes. In years past, what little crop was produced was eaten by the birds.  Not sure what happened this year but we have more red currants than we can handle!  Red currants have topped salads and cereals and they’ve been made into jelly and cordial.  The best way to eat them is by the handful straight from the bush but these muffins are a close second for me.

Red Currant and Almond Muffins

150g plain flour
100g ground almonds
3 tspn baking powder
Pinch salt
50g caster sugar
1 egg
225ml milk (plus extra if required)
60g butter melted
1 cup red currants
1 tblspn almond extract

  • Preheat oven to 190oC and butter a muffin tin.
  • Sift together the dry ingredients into a large bowl then stir in the red currants until evenly distributed.
  • Briefly whisk together the wet ingredients and add to the bowl. Use a large metal spoon to fold ingredients together. Do this briskly and do not over mix. Add a little extra milk if required.
  • Spoon batter into tins (approx ⅔ full). Bake for 25 mins until risen and golden on top.

Spiced Chickpea Puffs

15161166125_ea0e4744c5_o

I’m off to North Carolina this weekend to teach another cooking course at the John C Campbell Folk School.  Cannot wait to return.  It’s a beautiful place, in every sense: a peaceful, creative, supportive environment in the tranquil, green Appalachians.  They run all kinds of craft based courses – ironmongery, weaving, painting, wood turning – and students come from far and wide to study for a week or two and soak up the mountain air.

This year my course’s focus is baking.  My students and I will be making cakes and biscuits and scones and puddings.  And there will be pastry too.  Pastry is the diva of the food world, I think.  A stunning performer but there’s no rushing it and it must be handled just right.  I’ve been practising different short-crusts and rough puffs for months now and have found the recipes that work for me (Leith’s and Dan Lepard, respectively).

Last week, however, I decided to give proper puff pastry a bash.  I’d always heard that even professional chefs don’t make their own and assumed it was going to be highly technical, time consuming and, ultimately, not really worth it.  Good puff pastry is available in the shops, after all.  But I was wrong on almost every count.

Following the Bourke Street Bakery recipe (superb book, by the way), it turns out that the process of laminating the butter into the flour is pretty straight forward.  It was time consuming in that I had to start 24 hours in advance and for the first few hours I was rolling  for a short time every 20 minutes, but it wasn’t labour intensive and I could potter about whilst the dough was resting.  And the end result?  Well, it was phenomenal.  Light, buttery, crisp and flaky pastry.  I will most certainly be making it again.

I used the pastry to make the following Spiced Chickpea Rolls (based on another recipe from the Bourke Street book) and they were a big hit with everyone who tasted them.  Even the most committed carnivore admitted they were better than their more common sausage counter part.

Shop bought puff pastry would work perfectly well here but should you feel the desire to try making your own, instructions can be found here.

IMG_0152

Spiced Chickpea Puffs

Makes 10

800g puff pastry

Olive oil

1 large onion, chopped

2 red peppers, chopped

4 garlic cloves, finely chopped

2 tins of chickpeas

1 heaped tspn cumin

1 heaped tspn coriander

½ tspn chilli flakes (optional)

250g fresh spinach

Juice of one lemon

½ tspn salt

3 tblspn tahini

Handful of chopped coriander

1 egg white

Paprika

In a large pan, heat a few tablespoons of olive oil over a medium high heat.  Add the onion and saute until starting to soften.  Add the peppers and cook for another 5 minutes before adding the garlic.  Cook for two more minutes before adding the spices and chickpeas.  Reduce heat and cook for 5 minutes more.  Stir occasionally and add a tiny bit of water if the mixture sticks at all.  

Stir in the spinach and pop a lid on to allow the spinach to wilt.  Once wilted, remove from heat and add the lemon juice, tahini and salt.

Spoon half the mixture into a food processor and whizz until a rough paste is formed.  Return to pan and mix to combine with whole chickpeas (you want a varied texture).  Stir through the coriander and let cool for an hour.

Heat the oven to 200oC.

Gently roll out the puff pastry to 5mm thick and cut into rectangles (slice – don’t press down), approx 15cm x 30 cm.  Spoon the mixture onto one side of the pastry then fold over and crimp edges together.  Place on baking tray.  Repeat until all pastry has been used. (There may be mixture left over – it makes a nice veggie burger.) Brush rolls with egg white and dust lightly with paprika.

Place in oven and turn temperature down to 180oC.  Cook for 30 mins then remove from baking tray and place on wire rack in oven.  Cook for another 15- 25 mins more until pastry is crisp on top and bottom.

Allow to cool slightly before eating.  
 

Hot Cross Buns

This summer I’m heading back to the John C Campbell Folk School to teach a British baking course.  Very exciting.

On the list to teach are Hot Cross Buns – beautiful, spiced tea cakes that are eaten around Easter.  I’d never made them before and expected them to be tricky but it turns out, they are very straightforward to make at home and are miles better than anything I’ve ever bought in the shops.  They also make the house smell utterly divine.  Can see these being made all year round from now on.

Hot x buns.jpg

Hot Cross Buns

300ml full-fat milk
50g butter
10g sachet dried yeast
500g strong bread flour (plus approx. 50g more)
1 tsp salt
75g caster sugar
2 tsp ground cinnamon
1 tspn mixed spice
130g sultana
60g mixed peel
1 egg , beaten

For the cross:
75g plain flour

For the glaze
3 tblspn caster sugar  & 1 tblspn water

  • Heat the milk and butter gently in a small pan until the butter has melted and the milk is warm.  Remove from heat and leave until the milk is tepid.  Add the yeast and leave for 10 mins.  
  • Meanwhile, sift the flour, salt, sugar and spices into a bowl.  Stir in the sultanas and mixed peel until well distributed.
  • Make a well in the dry ingredients then add the yeasty milk and egg.  Stir to form a sticky dough.  Tip dough onto a floured surface then knead for 10 – 15 minutes.  If the dough is too wet to control, add a little more flour but do this very gradually.  You’re looking for a soft, light dough.  I do this by hand as I’ve found it difficult to get the consistency right in a mixer.  
  • Once dough is smooth and elastic, place in  an oiled bowl.  Cover and leave somewhere warm until double in size.  Remove from bowl.  Punch out the air and knead for another minute. Place in bowl to rise again.  
  • Once dough has doubled in size, remove from bowl and roll into a sausage shape.  Cut tangerine sized pieces off the dough (75/80g) and roll into a ball.  Place dough balls on a baking tray lined with parchment, 5cm apart.  Continue until all the dough is used.  Cover with a clean dish cloth and leave in a warm place to rise again.  Preheat the oven to 220oC / 200oC(fan).
  • Mix together the plain flour and water until a smooth paste has formed.  It shouldn’t be too runny.  Spoon into a plastic sandwich bag and cut the very tip off one corner.  The dough squeezed out should be approximately 5mm wide – it’ll spread.  Once dough balls have doubled in sized, slowly pipe crosses on each of the buns.
  • Bake the buns in the oven for 10/15 mins until buns are bronzed and risen.  Remove from oven.
  • Whilst buns are baking, make the glaze.  Add the sugar and water to a pan and heat gently until sugar is completely dissolved.  
  • Brush the hot buns with the glaze immediately after they come out of the oven.  Place buns on a wire rack to cool down.

Best eaten warm with butter and/or jam.  If you aren’t eating these on the day, freeze once cooled.  

Venison & Black Bean Chili (for a chilly day)

24138952420_b7d21ac5ef_c

Made the following dish last summer and loved it.  Knew at the time that we’d enjoy it even more come winter.  And so we do.  The bright flavours and warming spices are perfect for days when the frost lies thick on the ground and two pairs of socks just aren’t enough to keep the chill from your toes.

23518300583_5d7c33c69a_z

Venison and Black Bean Chili (adapted from Diana Henry’s Food from Plenty)

(serves 6 – freezes wonderfully)

300g dried black beans, soaked over night

750g diced venison 

2 medium onions, chopped

4 plump garlic cloves, chopped

1 tspn dried chilli flakes

1 tblspn cumin

2 tins chopped tomatoes

600ml light ale or lager

1 tblspn tomato puree

1 tblspn brown suar

1 tblspn dried oregano

To Serve:

Limes

Chopped coriander

Chopped spring onion

Yogurt or sour cream

  • Cook the beans in plenty of unsalted water until just tender.  Drain and set aside.
  • Add enough olive oil to cover the base of a large, heavy based pan.  Heat to medium-high then brown the venison in small batches.
  • Once all the venison is browned, place it to one side.  Reduce the heat to medium and add the onion to the pan.  Cook until truly soft and beginning to turn golden (about 20 mins).
  • Add the garlic, chili flakes, cumin and oregano to the pan and cook for 30 seconds.
  • Add the tomatoes, beer, sugar, and venison to the pan.  Season with salt and pepper then bring to the boil.  Reduce the heat and simmer gently, covered, for an hour.
  • Remove lid, add beans and cook for another hour until sauce is thickened and venison is tender.
  • Serve topped with coriander, spring onions, a squeeze of lime and some sour cream.


The Mountain Café’s Sweet Potato and Peanut Butter Fritters

Given the choice of having a meal anywhere in the Highlands, I’d chose The Mountain Cafe in Aviemore everytime.  Light, bright and airy, it’s open for breakfasts and lunches every day (see the Facebook page to be sure)  and is a wonderful place for a coffee and cake or a satisfying meal after a Cairngorms hillwalk or a Feshie cycle.  It’s ridiculously popular.  There’s rarely been a visit where I haven’t had to queue for a table for 10/20 minutes but it has never ever put me off.  I know what’s waiting inside.

The Scottish breakfasts are perfectly cooked with high quality ingredients; the sandwiches have freshly baked breads and generous fillings; the soups are just beautiful; and I challenge any salad-hater to remain so after trying one at the Mountain Cafe.

My favourite dishes are the kiwi fritters.  They used to only serve the Kiwi Sweetcorn fritters (which were excellent) but now do a Fritter of the Day.  The below recipe (kindly shared by Kirsten, the owner and head chef) has been my favourite so far.

Sweet Potato and Peanut Butter Fritters

(Serves 3 – Makes 6 fritters – Double the recipe to feed a crowd and adjust the amount of chilli to suit your preferences.)

1 cup roasted pumpkin or sweet potato, mashed
1 garlic clove, finely diced
2 free range eggs, lightly beaten
1 large handful fresh coriander, roughly chopped
1 spring onion, finely chopped
1/4 cup good quality crunchy peanut butter
1/4 cup coconut cream
zest of 1 lime
2/3 cup ground almonds
1 heaped tablespoon buckwheat flour (could also also use spelt flour or regular wheat flour)
Dried chilli flakes, sea salt and cracked pepper to season
coconut oil or ghee for fryingTo serve: shredded crunchy veg (e.g. courgette, pepper, carrot) lime wedges, greek yoghurt or sour cream, sweet chilli sauce, additional chopped spring onion and coriander

  • Combine all ingredients in a large bowl and mix well. Season with salt and pepper and a generous dash of dried chilli flakes.
  • Heat coconut oil or ghee in a sauté pan over a medium heat. Fry dessertspoons of batter for 2-3 minutes on each side, turning the heat down if the fritters are colouring too quickly.
  • Fritters can be served immediately or enjoyed at room temperature.
  • The Mountain Cafe (and I) serve two of these per person along with plenty of crunchy veg and a drizzle of sour cream and sweet chilli sauce.